基于 Schema 的动态表单构建:AutoForm + Shadcn + Remix 指南
autoform + shadcn + remix 的基本使用。
在工作中,我需要根据数据中的数据,动态生成需要提交的表单,现在需要找一个通过schema 可以动态生成react 的组件,我就找到了autoform.以下是autoform + shadcn + remix 的基本使用,
在工作中,我需要根据数据动态生成需要提交的表单,因此我找到了一个可以根据schema动态生成React组件的库——autoform。为了进一步优化用户界面,我决定将autoform与shadcn和remix结合使用,以实现更高效的表单生成和管理。
以下是我在实际项目中遇到的需求和挑战:
动态表单生成:需要根据后端返回的schema动态生成表单字段和结构。
UI组件库集成:希望使用shadcn提供的高质量UI组件,以提升表单的用户体验。
Route和数据管理:利用remix的路由和数据加载能力,实现表单的动态渲染和数据提交。
为了实现这些需求,我按照以下步骤进行了开发和集成:
1. 安装必要的依赖
首先,在项目中安装autoform、shadcn和remix的相关包: For shadcn/ui:
npx shadcn@latest add https://raw.githubusercontent.com/vantezzen/autoform/refs/heads/main/packages/shadcn/registry/autoform.json它这时候会安装一些列的包,如果你有的需要确认是否覆盖原来的版本。
2. 配置Remix
在Remix的路由文件中,创建一个动态路由用于处理表单生成:
// app/routes/dynamic-form.tsx
import { json } from '@remix-run/node';
import { useLoaderData } from '@remix-run/react';
import { ZodProvider } from "@autoform/zod";
import { AutoForm } from "~/components/ui/autoform";
export async function loader({request}: LoaderFunctionArgs) {
// 模拟从数据库获取的数据
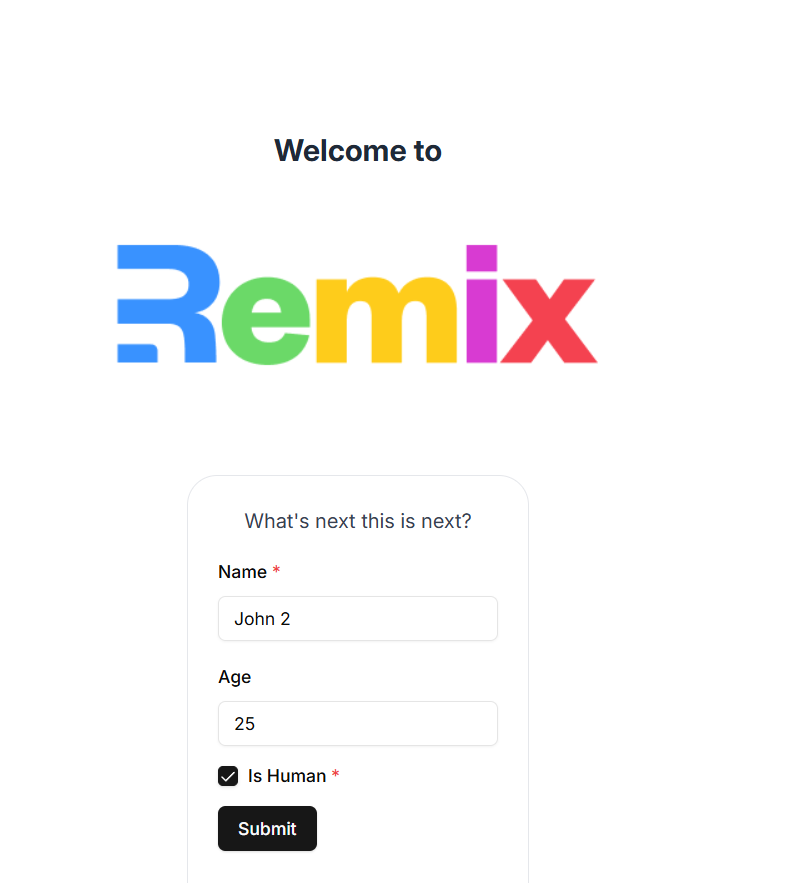
const existingData = {
name: "John 2",
age: 25,
isHuman: true
};
// 模拟从数据库获取的 schema 定义
const schemaDefinition = {
fields: {
name: { type: "string", required: true },
age: { type: "number", required: false },
isHuman: { type: "boolean", required: true }
}
};
return json({ schemaDefinition, existingData });
}
//页面组件
export default function DynamicForm() {
const { schemaDefinition, existingData } = useLoaderData<typeof loader>();
const submit = useSubmit();
// 根据 required 标志构建 schema
const mySchema = z.object(
Object.entries(schemaDefinition.fields).reduce((acc, [key, field]) => {
let fieldSchema;
switch (field.type) {
case "string":
fieldSchema = z.string();
break;
case "number":
fieldSchema = z.coerce.number();
break;
case "boolean":
fieldSchema = z.boolean();
break;
default:
fieldSchema = z.any();
}
// 如果字段不是必需的,添加 optional()
if (!field.required) {
fieldSchema = fieldSchema.optional();
}
return { ...acc, [key]: fieldSchema };
}, {})
);
//重新构建出来schema
const schemaProvider = new ZodProvider(mySchema);
return <AutoForm
schema={schemaProvider}
defaultValues={existingData}
onSubmit={async (data) => {
// 使用 useSubmit 提交表单
const formData = new FormData();
Object.entries(data).forEach(([key, value]) => {
formData.append(key, value.toString());
});
submit(formData, {
method: "post",
});
}}
withSubmit
></AutoForm>
}
3. 集成AutoForm和shadcn
在AutoForm组件中,使用shadcn的UI组件来渲染表单字段。为实现这一点,需要自定义AutoForm的渲染器:
// app\components\ui\autoform\components\Form.tsximport React from "react";
import { Form as RemixForm } from "@remix-run/react";

export const Form = React.forwardRef<
  HTMLFormElement,
  React.ComponentProps<typeof RemixForm>
>(({ children, ...props }, ref) => {
  return (
    <RemixForm ref={ref} className="space-y-4" {...props}>
      {children}
    </RemixForm>
  );
});

Form.displayName = "Form";
4. 处理表单提交
在AutoForm组件中添加提交处理逻辑:使用remix的form之后,表单是标准表单,需要在remix路由中增加action对表单进行处理。
export async function action({request}: ActionFunctionArgs) {
  const formData = await request.formData();
  const data = Object.fromEntries(formData);
  console.log("action 中处理表单");
  console.log(data);
  return json({ success: true });
}
7. 测试与优化
在完成以上步骤后,进行充分的测试,确保表单能够正确生成并提交数据。根据测试结果,优化表单的UI和交互体验,以提升用户满意度。
总结
通过将autoform、shadcn和remix结合,我成功实现了基于schema的动态表单生成和提交功能。这不仅提高了开发效率,还为后续的维护和扩展提供了便利。未来,还可以进一步优化表单的渲染性能,增加更多的表单字段类型,以满足更复杂的业务需求。
参考项目地址